Flash Project 2:
Creating AdvancedAnimations
Before beginning the tasks in this project, create a new folder in your home directory, naming it Lastname Project 2.
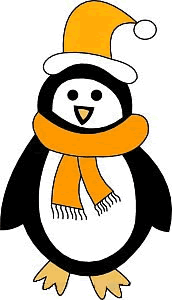 Task 1 - Trace Bitmap to Vector and Shape Tween Task 1 - Trace Bitmap to Vector and Shape Tween
- Begin
new document, save in your Project 2 folder as Lastname
Penguin.fla.
- Change the color of the stage to some light color, maybe blue to look wintery.
- Copy and save the image at the right, then import
the image onto the stage, centering it horizontally and vertically.
- Convert the image to Vector and prepare it for animating:
- With the bitmap image selected, choose Modify > Bitmap > Trace Bitmap.
In the Settings dialog box, set the Color Threshold at 100, the Minimum
size at 30, and the Curve Fit as Tight. Click OK.
- Deselect the bitmap. Click in various parts of the image to see that
it has been divided into the different color blocks, and each is now
a different object.
- Click in one of the outside white areas. Press Delete. Repeat to
remove all the surrounding white areas.
- Select each of the sections of the scarf, and the hat, and change
the color.
- Animate the eyes to blink:
- Name the current layer penguin. Create
a new layer above the penguin layer and name it eyes.
- Select the eyes from the penguin layer, and paste in place on the
eyes layer.
- Hide the eyes layer, and fill the empty space in the penguin's face
with white. Unhide the eyes layer.
- Extend both layers to frame 50-60 or so. Make keyframes at frame 3
and 5 on the eyes layer.
- With the eyes deselected, and frame 3 selected, adjust the eye shapes
to 'close' the eyes as if the penguin is blinking.
- Add a shape tween in both small frame ranges to make the eyes seem to
blink.
- Test your movie.
- Make any adjustments you need in the blink frame
(3). When you are satisfied, save and publish your animation.
Task 2 - Animating a Puppet Made of SymbolsDancing-Man.fla
- Right-click on the doc link at the right and open the file dancing_man.fla. Save in your Project 2 folder with your lastname at the beginning.
- Examine the file for a moment - look in the library to see that each body part is a separate movieclip symbol.
- Arrange the puppet:
- Move the head up a bit to be out of the way for now.
- Click on an upper arm section and bring it in front of the body section; repeat with the other upper arm.
- Add the Arm bones:
- Choose the Bone tool from the Tools panel and click at his neck to set the head (top/beginning point) of the bone, and drag to the shoulder joint to set the tail (bottom/ending point).
- Click again to add a bone from the tail of the first bone to the elbow joint.
- Add a third bone from the tail of the second bone to the wrist area on the hand.
- Test your structure by dragging the hand around.
- Undo to return to the original pose.
- Add constraints to control movements:
- Click the first bone.
- On the Properties panel, uncheck the Enable box in Joint: Rotation.
- Now test the movment - constraints are always put on the head of a bone, not the tail.
- Undo to reset pose.
- Click the forearm bone. On the Properties panel, check the Constrain property.
- Test the movement again. Note that the hand can still rotate into an unnatural position.
- Reset the pose.
- Use a 'handle' to constrain the hand:
- From the Library, drag the handle symbol to the stage on the Puppet layer, and place it just past the end of the hand.
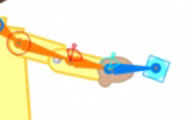 Draw another bone from the wrist to the handle. Draw another bone from the wrist to the handle.- Test by dragging the handle. The hand will still move into unnatural positions, but now there is a bone head (hehe) that can be constrained.
- Adjust the hand in the position you see in the illustration at the right.
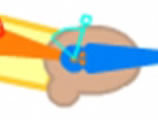 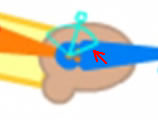 On the Properties panel, enable constraints. Then increase the Max value of the joint rotation to match the 'handle' in the constraint widget. On the Properties panel, enable constraints. Then increase the Max value of the joint rotation to match the 'handle' in the constraint widget.
- Repeat what you have done so far on the other arm.
- Add the Leg bones:
  With the bone tool, drag from the head of the first bone, drag to where the hip should be. With the bone tool, drag from the head of the first bone, drag to where the hip should be.
- To adjust where the bone tail is attached, use the Free Transform tool to select the upper leg symbol. Move the rotation spot onto the plus sign that indicates the joint.
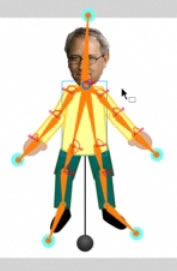
- Continue to add bones, including the handles at the end of the feet
- Add rotation constraint so the ankles will not rotate.
- For the knee and hip joints, add constraints as needed to allow only natural movement.
- Add the head bone
- Move the head back down into position.
- Add a handle and bone to control the head as you did with the hands and feet.
- Add a constraint so the head can only move naturally.
- Animate the puppet:
- Adjust the puppet in a pose you want for the beginning frame (probably like in the illustration at the right.
- On the Armature layer, drag to about frame 45 and insert a pose.
- Move to frame 15 and change the pose.
- Move to frame 30 and change the pose again.
- Test your movie to see that you like your puppet dance. Make any adjustments you wish.
- Remove the handles and publish:
- Switch to the Library and double-click the handle symbol to enter its editing mode.
- Change the alpha value of the symbol to make it transparent.
- Return to Scene1.
- Test your movie. When you are satisfied, save, publish and close.
Adapted from layersmagazine.com
Task 2 - Animating a Solid Character
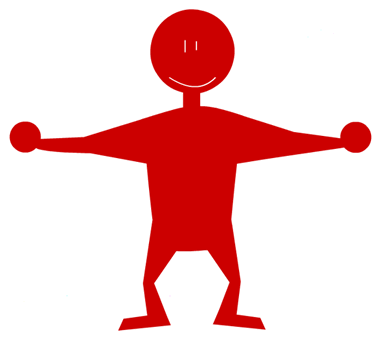 Start a new Flash 3.0 document. Save in your Project 2 folder as lastname redman.fla. Start a new Flash 3.0 document. Save in your Project 2 folder as lastname redman.fla.
- Prepare the Character:
- Create a Character with your favorite vector editing tool such as Flash, Illustrator, or Fireworks, as you prefer.
- The following are some best practice tips you should to bear in mind as your create your character.
- Closed stroke and fill- your graphics should always have closed stroke. When tweening in between poses, closed stroke makes the best result.
- Simplfy shape - your graphic should have a simple shape. Optimize your shape and remove unnecessary points on the shapes.
- Simple colour – Your graphics should have a simple color for easy tweening.
- Symmetry Pose shape – Draw your character in symmerty pose shape. The pose shape should have the arm and leg easy to set the pose.
- If you created your character outside of Flash, import the file to the stage now.
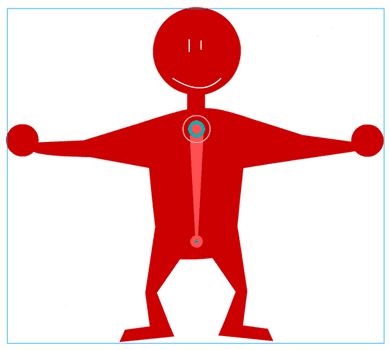
- Add bone structure to the character:
- Select bone tool in the toolbar.
- To create main bone on the body, click on the position under the head and drag to near the hip of the character to create a bone.
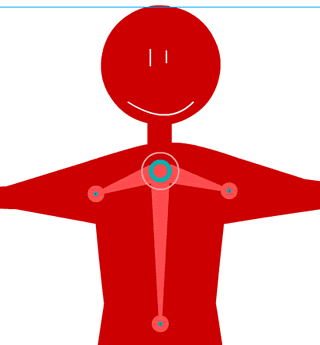
- To create the shoulder bone, move the mouse to the join of the main bone under the head. Drag and create the left shoulder bone parallel to the shoulder.
- Repeat for the right shoulder.
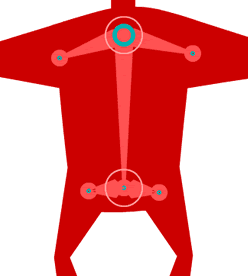
- To create the hip bone, move the mouse to the join of the bottom end of the main bone under the head. Drag and create the left hip joint.
- Repeat for the right hip.
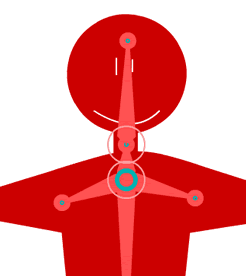
- To create the head and neck bone, drag from the joint under the head and create a small neck bone.
- Then, drag from the end ofthe neck bone and create a bigger bone to use for head.
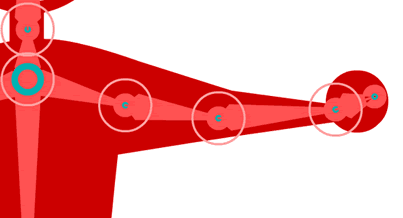
- To create the arm bones, start from the end-joint of the left shoulder bone. Drag and create 3 bone along the left arm. Shoulder to elbow, elbow to wrist, wrist to hand.
- Repeat for the right arm.
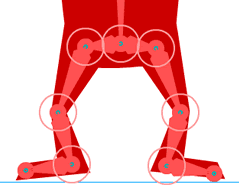
- To create the leg bones, start from the end-joint of the left hip bone. Drag and create 3 bone along the left leg. Hip bone to knee, knee to ankle, ankle to foot.
- Repeat for the right leg.
- Select your entire character and remove any stroke.Save your character shape.
- Optimize the character and bones for animation:
- Optimize body bone
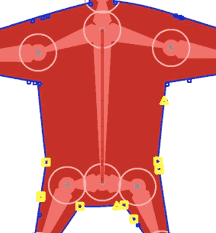
- Press and hold on the bone tool icon in the toolbar, the binding tool icon will appear. Select it.
- Select the body bone and the points on the 'skin' affected by this bone will be highlighted in yellow.
- Check to see if the points along the skin are appropriate for the selected bone.
- To add a point to a bone, click on the point and drag to the bone you want it connected to.
- To remove a control points from a bone, Ctrl-click a control point that is highlighted in yellow.
- Optimize hip and shoulder bones
- Disable all the connection from these bone to the shape:
- Select binding tool and click on the left shoulder bone.
- To remove control points from the bone, Ctrl-click each control point that is highlighted in yellow.
- Repeat for right shoulder bone.
- Repeat for the hip bones.
- Disable the rotation of these bones:
- Use the select tool to select the shoulder bone.
- In the Properties panel, you will see the option panel for Joint: Rotation. Click on the “enable” check box to disable it.
- Repeat for the right shoulder and two hip bones.
- Optimize head and neck bone
- Select the neck bone.
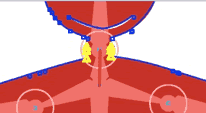 From the Properties panel, click the Constrain check box, and set the rotation constriant to -15 to +15 degrees. From the Properties panel, click the Constrain check box, and set the rotation constriant to -15 to +15 degrees.
- Click the neck bone with the bind tool, and only connect points near the neck area.
- Select the head bone. In the Properties panel, set the rotation constriant to -20 to +20 degrees.
- Then connect the rest of the points in head area to the head bone.
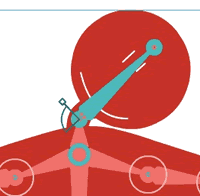
- Now, you can test the head movement. Use the select tool and select the head bone.
- Drag and move the bone and you can see the head move with the bone.
- Undo to reset the bone position to normal.
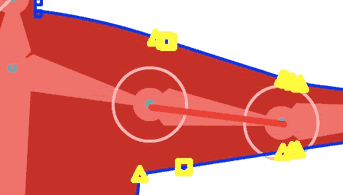 Optimize arm and bone Optimize arm and bone
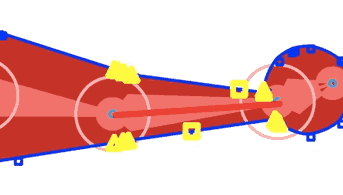
- Set the connections for each bone - use the bind tool to select the upper arm bone.
- Add or subtract connections as needed to be like the illustration at the right.
- Select forearm bone.
- Use the binding tool to add or delete connecttions as needed to be like the illustration at the right.

- Select hand bone. Use the binding tool to connect all points from the hand to the bone.
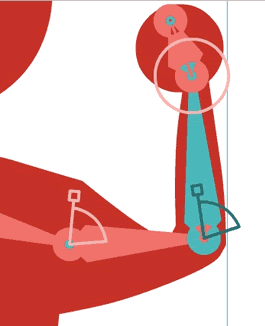
- Set the rotation constraints for each bone:
- Limit the ratation of the upper arm from -10 to +70 degrees.
This will make sure the arm will not collapse with the body and head.
- Then we limit the rotation of the lower arm from -80 to +0 degree.
This make the arm move more nature.
- Test the movement of arm.
The arm looks strange when the lower arm bome is moved. You will need a further tweak on the shape.
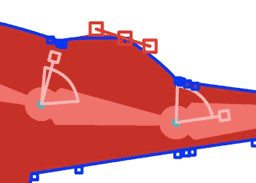
- First, add one more point on the arm: Use the add anchor tool (Pen tool flyout) - click on the arm and add a point.
- Move the point and make the shape like the illustration.
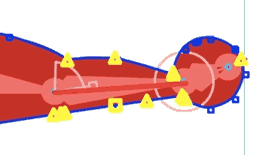 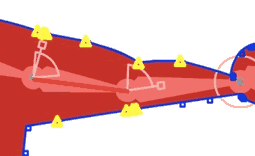
- Next, reconnect some point to the bones.
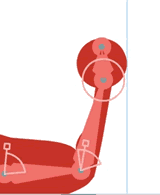
- Now, the arm looks better. Repeat the steps with the left arm.
- Optimize leg and bone
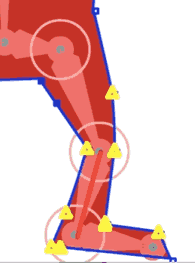 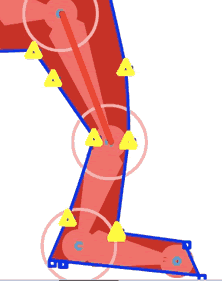 Select the upper leg bone. Use the binding tool to connect the upper area shape to the thigh bone. Select the upper leg bone. Use the binding tool to connect the upper area shape to the thigh bone.
- Select the lower leg bone and connect the lower leg shape.
-
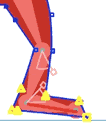 Last, select the foot bone and connect the foot shape. Last, select the foot bone and connect the foot shape.
- Set the rotation constraint for each bone.
Limit the ratation of the upper leg from -45 to +25 degrees. Then we l
K
imit the rotation of the lower leg from 0 to +45 degrees.
Limit the rotation of foot from 0 to +45 degrees.
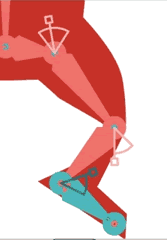 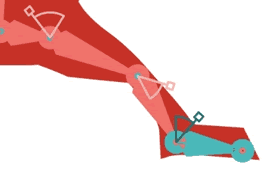
- Test moving the bone.
You can see the shape move with the bone like a skin of the bone.
If the shape not moving correctly, you can adjust the connection between bones and points.
- When you are satisfied with your work, save.
- Make your Character Dance:
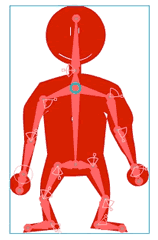
- Set the start pose and end pose
- Start at a standing pose and end with the same pose. Using the select tool press and drag on the bone to where you want.
- Because you need to have the same pose at the end, create a new key frame at 150 frame by pressing F6.
Now, you have 2 key frame at frame 1 and frame 150.
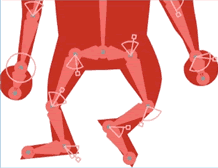 Set the leg poses Set the leg poses
- Select fram 15. Move the foot bone, and the leg will follow like a linked chain.. Set the pose of leg like at the right.
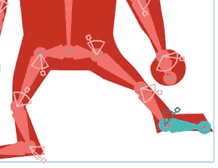 At frame 30, create a new key frame. Set the pose of leg like at the right. At frame 30, create a new key frame. Set the pose of leg like at the right.
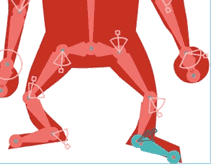 At frame 45, create a new key frame. Set the pose of leg like at the right. At frame 45, create a new key frame. Set the pose of leg like at the right.
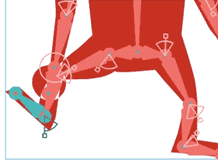 At frame 60, create a new key frame. Set the pose of leg like at the right. At frame 60, create a new key frame. Set the pose of leg like at the right.
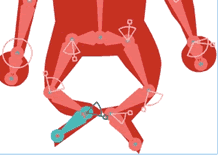 At frame 90, create a new key frame. Set the pose of leg like at the right. At frame 90, create a new key frame. Set the pose of leg like at the right.
- Set the arm poses
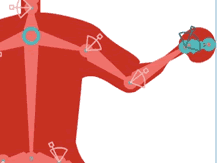 Drag on the hand bone to move the arm. At frame 30, set the pose of arm like at the right. Drag on the hand bone to move the arm. At frame 30, set the pose of arm like at the right.
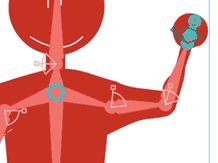
- At frame 40, create a new key frame. Set the pose of arm like below.
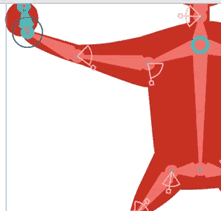
- At frame 55, create a new key frame. Set the pose of arm like at the right.
- At frame 70, create a new key frame. Set the pose of arm like at the right.
- Set the head pose
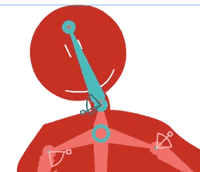
- At frame 23, create a new key frame. Set the pose of head like at the right.
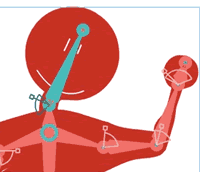
- At frame 37, create a new key frame. Set the pose of head like at the right.
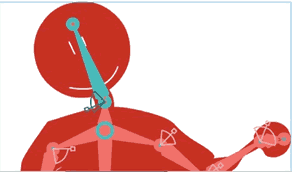
- At frame 47, create a new key frame. Set the pose of head like at the right.
- Test the animation.
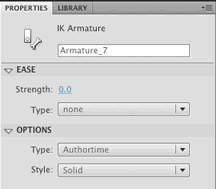
- Add easing to the animation.
- Click on the time line, between two key frames.
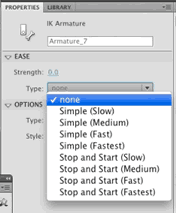 On the Properties panel, add the easing effect. Experiment with different strengths, directions (in or out) and type of easing effect (dropdown as shown). On the Properties panel, add the easing effect. Experiment with different strengths, directions (in or out) and type of easing effect (dropdown as shown).
- Continue to add easings as needed in all the timeline spaces, to make the animation look as lifelike as possible.
- When you are satisfied with you animation, save, publish and close.
Adapted from flashenabledblog.com
Task 3 - Using the Bone Tool for Non-Character Animation
You will create an animation that simulates blades of grass (probably from another planet!) moving
- Start a new Flash 3.0 document, and save it in your Project 2 folder as Lastname GrassAnimation.fla.
- Create a Movie Clip
- Insert a new Movie Clip symbol, naming it grass_mc.
- Enter editing mode for the movie clip.
- Drawing the Blade of Grass
- Select the Pencil Tool
- At the bottom of the Tools panel, set the Pencil Mode to Smooth.
- Be sure you are in the grass_mc movieclip timeline, and start drawing your shape's outline.
Do make sure that the shape you have drawn is fully closed.
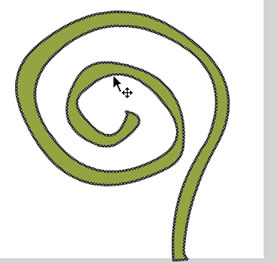
- Use the Paint Bucket tool to give your blade of grass a fill color.
- Select the stroke and delete it.
- Setting up the Bones
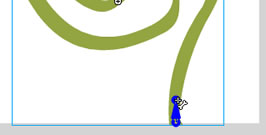
- With your shape selected, click the Bone tool from the Tools panel.
- With the Bone tool, click on the base of your shape and start moving your mouse up to create the first segment of your joint: After dragging up the mouse up a short way, release the mouse to set the first joint:
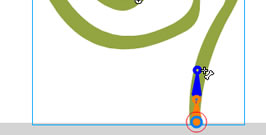 Click on the tip of the joint you just created and begin drawing another joint: Click on the tip of the joint you just created and begin drawing another joint:
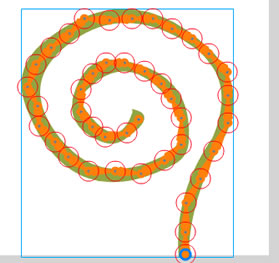
- Keep creating these joints hugging the contours of your shape until you hit the end of the road.
That is a lot of joints for a blade of grass!
- Creating the IK Animation
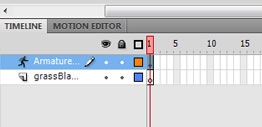 In your timeline, you will see a layer called Armature created for you: In your timeline, you will see a layer called Armature created for you:
Check the layer that contained your grassblade. It should be empty now, so you can delete the layer.
- On the Armature layer, right click on Frame 120, and insert a pose.
- Around Frame 60, insert another pose.
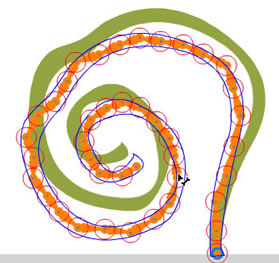 With your playhead on Frame 60, click on the Selection Tool to go out of Bones mode. With your playhead on Frame 60, click on the Selection Tool to go out of Bones mode.
- Make sure your shape is selected, then click on any of the joint endings and move them around with your mouse cursor:
- Once you have gotten your shape in just the right pose that you want, test your scene.
- Add Instances to the stage:
- Return to the main timeline and place an instance of the grass_mc movieclip on the stage. Test the movie.
- Add three move instances 'behind' the first instance, sizing and placing them as in the example at the beginning.
- Reduce the Alpha setting for these three instances equally.
- Add one more instance, again 'behind' the original instance. Make it very large, and lower the Alpha value to almost transparent.
- Test your movie. When you are satisfied with your results, save, publish and close.
Adapted from www.kirupa.com
Task 5 - Animating Bitmaps in Movie Clips
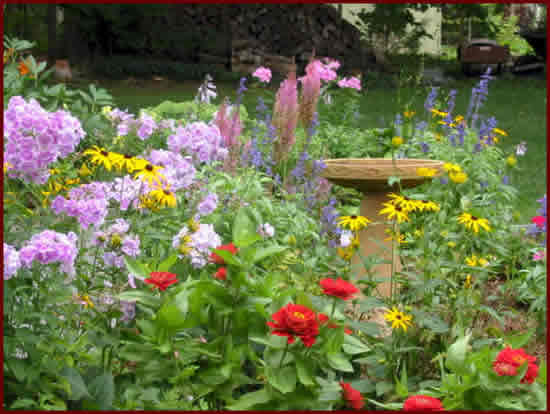  Begin
a new document, save in your Lesson10 folder as Lastname
BitmapGarden.fla. Begin
a new document, save in your Lesson10 folder as Lastname
BitmapGarden.fla. - Copy the images at the right into your Flash folder. Import the
flowergarden image onto the stage, centering it horizontally and vertically.
  Import
the three butterfly images to the library. Import
the three butterfly images to the library.
- Create and edit butterfly bitmap symbols:
- From the Insert menu, choose New Symbol. Name the symbol to describe
one of the butterflies, and click the Graphic button, then click ok
- Drag a butterfly onto the empty symbol editing
area.
- Break the bitmap apart, then use the lasso/magic
wand and eraser to remove the background, isolating the butterfly.
- Select the bitmap. Use the Free Transform tool to resize the butterfly
proportionally to no more than 75 or so pixels wide.
- Center the bitmap
horizontally and vertically on the stage. Close the symbol.
- Repeat with the other butterflies, creating new graphic symbols,
removing backgrounds resizing and centering.
- Create butterfly movie clips
- Insert a new symbol, making it a Movie Clip symbol, and naming it
the same as one of the butterfly symbol, with mc at the end.
- In the blank movie clip, drag the appropriate butterfly onto the
stage, centering it horizontally and vertically.
- Add a motion tween of about 5-7 frames. At the end of the short motion tween, insert a Position keyframe to set the original butterfly in that frame. In the center
of the tween, use the Free Transform tool to change the width only of the
butterfly, making it about half as wide as the original.
- Test the animation to see that
the butterfly seems to be waving its wings. Close the symbol.
- Repeat with the other butterflies, creating movie clips, adding
and animating the butterfly.
Make each butterfly animation a different length.
The shorter the animation, the
faster the butterfly wings will flutter.
- Assemble the garden animation:
- Rename the existing layer as garden, or
some other appropriate name. Add frames to extend the background to
frame 50.
- Create three new layers named fly1, fly2, and extras.
- On the fly1 layer, drag an instance of the butterfly movie
clip with a medium flutter rate, and place just off the left or
right edge of the image. Rotate it so that it will look right to fly
across part of the garden background.
- Drag the single keyframe to the right to between about 5 and
15.
- Add a motion tween, extending it so frame 45 or so. At the end of the motion tween, postition the butterfly so that it is
off another side of the stage, where it would be if it had flown across
the garden, and adjust the rotation if needed.
- Adjust the path of the motion tween, so that it makes a slight S-curve from beginning to end.
- Select the motion tween and orient the symbol to the path (Properties panel).
- Test the movie - the butterfly
should move across from one side to another, and because the movie
clip causes the flutter, it appears to by flying across.
- To the fly2 layer, add an instance of the butterfly symbol with the fastest flutter rate, and add a motion tween. In frame 1, place the butterfly off the screen where you wish, then move the ending frame position across the screen and off.
- Make the motion path very curvy, looping back on itself as well.
- Rotate the butterfly at the beginning and ending of the path, to align along the
path.
- Select the motion tween and orient the symbol to the path.
- Test the movie - the butterfly should be fluttering along the path.
Adjust the speed and placement on the path if needed, adjusting the
keyframes in the movieclip..
- Drag the extras layer to just above the garden layer. Add frames
to extend the layer to frame 50.
- On the extras layer, drag an instance of the butterfly movie
clip with the slowest wing flutter, and place it in a location to
look like it has landed on a flower or other object in the picture.
Adjust the size and rotation of the butterfly as you like to look well
on its 'perch'.
- Add 2-5 more butterflies to this layer, just for decoration.
If you prefer to flutter one or two of them, then add the movie clip
symbol instead of the graphic symbol.
- Test the movie to see the results.
- When you are satisfied with your animation, save, publish and close.
Zip your Project 2 folder and place a copy in your Turn-in folder in the common drive.
|

