
![]()
Fireworks Practice Set
In this practice you will work with bitmap images to crop, scale, repair and select from them. You will combine vectors objects and text with bitmaps to create a banner that could be used on a website.
Before you begin:
PracticeFiles.zip Right-click the document link at the right and extract the files your Fireworks folder. Inside your Fireworks folder, create a new folder named Lastname FW Practice. You will save your completed files in this folder
Task 1: Cropping and Retouching Photos
 Crop Images:
- Open the file Mark_actor06.jpg (in Fireworks).
- Select the Crop tool
 .
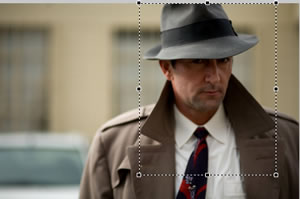
. - Click and drag a box around the face of the actor. Include the hat and part of the tie, as shown in the illustration at the right.
- Crop the image by double-clicking within the crop area, or by clicking in the crop area and pressing Enter.
This crop is a little too close to the collar, so you will go back and fix it.
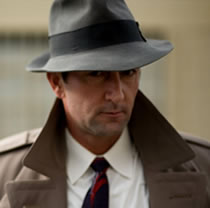 Press Ctrl + Z, or choose Undo from the Edit menu. Repeat the undo and you should see a running border selection rectangle around the crop area.
- Click the crop tool again to select it. Drag the crop handles to widen the area on both sides, and drag the bottom up to touch the red in the tie.
- Crop the photo.
Your second crop should look similar to the one at the right. - Save your file in your FW Practice folder as Lastname CropPractice.png and close it.
- Darken and lighten images:
- Rename the file detective.png, adding your lastname at the beginning, then open the file.
It's a pretty good picture, but the face is a bit too dark, and the white shirt is a bit too bright. 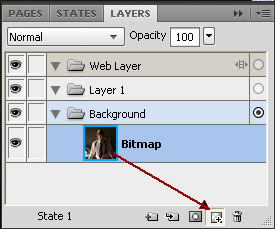 To preserve a copy of the original image, drag the thumbnail of the image in the Layers panel down to the New Bitmap Image icon at the bottom of the panel.
- Double-click the word Bitmap on the selected layer (the top one), and rename it Retouch.
- Use the Zoom tool to surround the subject's face to zoom in on just that section of the image.
- Lighten with the Dodge tool:
- Select the Dodge tool. On the Properties panel, set the Size to 48, the Edge to 100, the Shape to Circular, the Range to Shadoew and the Exposure to 6.
- Carefully paint over the actor's face and neck without releasing the mouse. Avoid painting over the hat, or the background. Because you chose Shadows, it is safe to touch the lighter part of the face.
- Press Ctrl + Z to undo the editing to see the difference - it is subtle, but noticeable.
- Press Ctrl + Y to reapply the dodging (undo the undo).
- Darken with the Burn tool:
- Switch to the Burn tool.
- Change the Size to 33, and the Exposure to 6. Leave the Edge Shape, and Range the same (100, Circular, and Midtones).
- Paint over the bright area on the subject's cheek.
Burning adds exposure, making the area slightly darker. This should give the face an appearance of more even lighting. - Return the Zoom level to 100%.
- Change the Burn tool size to 60, the Range to Highlights, and the Exposure to 8.
- Without releasing the mouse, paint ove rthe white shirt lseeve and shirt on the left side of the image.
- Hide the Retouched copy of the image (click the eye icon off) to compare to the original. Though each change was small, the overall effect is substantial. Be sure you turn the layer back on.
- Continue to make adjustments if you like, then save the file and close it.
- Rename the file detective.png, adding your lastname at the beginning, then open the file.
- Work with a high-resolution image:
- Open and resize a large image:
- Open the file policeman.jpg, clicking the Open as Untitled option at the bottom of the Open dialog box.
This file is quite large - 4368 x 2912 pixels in size, much too large for use on the web. You will need to resize it. - Choose Modify > Canvas > Image Size. Be sure that the Constrain Proportions option is checked. Set the width to 600 pixels, and the height will change automatically. Click OK.
- Open the file policeman.jpg, clicking the Open as Untitled option at the bottom of the Open dialog box.
- Apply the Unsharp Mask Live Filter:
- Open and resize a large image:
- Add a Live Filter and choose Sharpen > Unsharp Mask.
- Change the Pixel Radius to 1
- Deselect the Preview options to see the image without sharpening. Then activate Preview again.
Notice how there is slightly more contrast a nd evena bit better separation between the officer and the background. This is because Unsharp Mask increases the contrast of only edge pixels (where dark and light pixels meet). - Click OK to apply the filter.
- Save in your FW Practice folder as Lastname Policeman.png, then close it.
 Use the Rubber Stamp tool:
- First method - permanent (destructive) cloning.
You will be literally replacing pizels in one area with pixels from another area. If you save and close, those pixels become a permanent part of the image.- Open the file Mark_actor02.jpg.
- Scroll down and zoom in on the cushion seat below the actors left foot and leg.
- Select the Rubber Stamp tool.
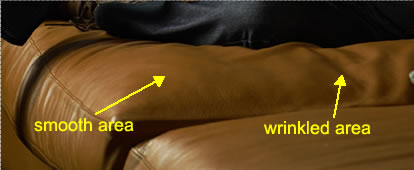
- Locate an area on the cushion that is mostly smooth and similar in brightness to the wrinkled area. Hold Alt, and click to sample the pixels from this area.
- In the Properties panel, set the brush size to 28 pixels and the edge to 100%. Leave the Opacity setting at 100.
- Move the cursor over to the beginning of the wrinkled area.
- Click and hold the mouse button, begin painting carefully ove rthe area, continuing painting until the large wrinkles are gone. It is good to do this in several different strokes, so that if you make a mistake, you only undo the last change, not the whole retouching.
The stamp tool duplicates the exact pixels, while the texture and tone remain visible. Some varioationin tone is fine, it should look realistic.
- Retouching on a separate bitmap object:
Many professionals prefer to do this type of retouching on a separate layer. This way, they avoid the potential for permanently changing, even ruining, an original image. You will do this on an empty bitmap object on another layer or sublayer.- Open the Layers panel if necessary, and resize the panel so you can see all the elements.
- Rename the Bitmap layer as Photo.
- Click the New Bitmap Image icon to the left of the 'trash can'.
On this new layer, you will give the actor an instant face lift. - Zoom in on the actor's face.
- Switch to the Rubber Stamp tool. Set the size to 5 and the edge to 100% for a nice subtle blend. Select both the Source Aligned and Use Entire Document options.
By using the entire document, Fireworks will sample from any visible pixels. Left unchecked, it would sample only from the current layer's object. - Move the cursor above the top wrinkle at the left. Hold Alt and click to set the source.
- Move the cursor straight down to be over the wrinkle, then carefully paint toward the right, following the entire wrinkle.
- When you are satisfied with the results, hold Alt and reset the source and do the other wrinkle.
- Switch to the Selection tool - you will see the object appear with the blue border on his forehead. Click the eye icon for the Bitmap layer. The wrinkles reappear. Click again to remove them.
- Save your FW Practice folder as Lastname Retouched Photo.png and close the file.
- First method - permanent (destructive) cloning.
Task 2: Working with Selections
There are four different selection tools - so it is helpful to choose the right tool for a given job.
| Tools | Types of jobs |
| Marquee tools - Regular and Oval | When you need to select regularly shaped objects. Use Shift to make square or circular selections. |
| Standard or Polygon Lasso tools | When you need to select irregular areas or make freehand selections. Close a selection by clicking the starting point or double-clicking the workspace. |
| Magic Wand tool | When the area surrounding the selection you want has similar shades of colors. Set the tolerance higher to extend the range of selected colors, set it lower to reduce the range. |
| Edge Options | Hard makes an edge exactly at the edge of the selection area. |
- Apply a filter to a selection:
- Open the file Backdrop02.jpg in Fireworks.
The sky is practically without detail - you will select this area apply a bitmap filter to it, which will permanently change the pixels. - Press Ctrl + Shift + D to create a clone of the image.
You now have two copies, one original in case of problems, and one to retouch. - Change the name of the bottom bitmap layer to Original, and the top bitmap layer to ReTouching.
- Switch to the Magic Wand and click once in the sky portion of the image.
 Choose View > Edges - this turns off the dotted edge, while maintaining the selection so you can alter it.
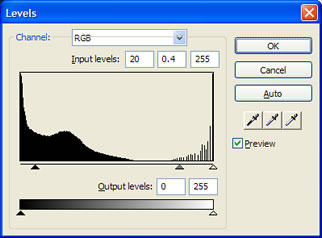
- Choose Filters > Adjust Colors < Levels.
The histogram shows the distribution of tones in the image. You can alter the shadows, midtones and hightlights.
Directly below the histogram box, you will see three arrow sliders - shadows on the left, midtones in the center, highlights on the right. - Change the Shadows value to 20, and the Midtones value to 0.4 (either type in the boxes or drag the sliders.)
- Toggle the Preview off and on to see the change, then click OK to apply the filter.
- Save in your FW Practice folder as Lastname Filtered Selection.png and close the file.
- Open the file Backdrop02.jpg in Fireworks.
- Use the Magic Wand with Keyboard Modifiers:
Sometimes you want to add to or subtract from a selection, and you can do this with keyboard modifiers.- Open the file actors_together.jpg in Fireworks.
Both faces have an washed-out appearance on the left side. You can correct this by applying a bitmap filter to a bitmap selection. - Clone the image and rename the layers as you did before.
- Switch to the Magic Wand tool, Set the Tolerance to 32, the Edge to Feather with a value of 4, and make sure the the Live Marquee option is selected.
- Move the cursor to the bright area of the detective's cheek and click once beside his mouth.
Notice this only selects contiguous pixels - the bright areas his nose and on the woman's face are not included. - Hold the Shift key and click the bright part his nose.
Notice that the Magic Wand cursor now has a plus sign on it to show you are adding to as selection. - Still holding Shift, click on the of the woman's cheek between her ear and her eye, then on the bright side of the bridge of her nose.
You now have four areas selected. - Choose Filters > Repeat Levels (Fireworks remembers the last filter choice from this session).
- Set the Gamma (Midtones) slider to 0.6. Toggle the Preview to see the difference and apply the filter.
- Save in your FW Practice folder as Lastname Complex Filtered Selection.png and close the file.
- Open the file actors_together.jpg in Fireworks.
- Working with the Lasso Tools to Replace a Background:
- Open the file Mark _actor07.jpg in Fireworks.
- Clone the image and rename the layers as you did before.
- Select the Magic Wand tool, and set the Edge to Anti-alias, and the Tolerance to 32, with Live Marquee checked.
- Click the gray cinderblock wall. Hold Shift and click again in another area of the wall to select all the gray area, but avoiding the shadow because this will also select the gun.
- Click to the right of the actor to add that wall area to the selection, and also add the black area at the bottom right.
If you accidentally select an area you do not want, switch to holding the Alt key (note the minus sign on the cursor) and click to subtract the area you did not want to select. - Add the small area below the gun to your selection as well.
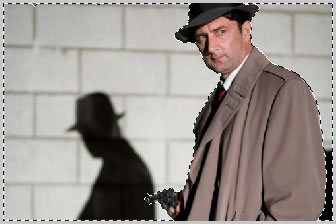 Switch to the Lasso tool.
 - Still holding the Shift key, draw around as much of the shadow as you can, avoiding the gun.
Holding Shift still adds to the selection. - Continue to draw areas of the shadow, avoiding the gun, until you have only the detective and his gun unselected.
Remember that you can use Alt to subtract from the selection if you accidentally get parts you don't intend.
You may want to zoom in on the area to see better as you work. - Choose Select > Convert Marquee to Path.
- The selection is removed and in its place is a new path object filled with the last attributes used for vector objects.
- Examine the path - if there seem to be any areas that are not replaced properly, then Undo, adjust the selection and convert to path again.
- Select the new path and fill it with a Pattern, choose the Light Panel pattern from the list.
- Adjust the pattern arrangement: With the fill selected, drag the centering circle down to the bottom of the image. Then locate the top square handle and drag it down to the top of the image.
- Save in your FW Practice folder as Lastname Lasso Selection.png and close it.
Task 3: Create a Watch Promotional Ad
- Start a new Fireworks document:
- Start a new file in Fireworks, setting both height and width to 500 px.
- Turn on the rulers if necessary.
- Save in your FW Practice folder as lastname watch_promo.png.
- Draw Filled Vector Shapes:
- Select the Rectangle tool. In the Properties panel, click the fill color square (beside the paint bucket icon) and choose black with the eyedropper tool.
- Draw a rectangle to cover the canvas.
- After you have drawn your rectangle, select it with the Selection tool, and check the Properites panel. The width and height should be 500, and the X and Y should be 0.
- Switch to the Ellipse tool (hold down the rectangle to get the flyout menu). Set the fill color to light gray.
- Draw an oval (ellipse) on the canvas, then adjust its properties to be 231 px wide by 401 pixels high, and located at X=20 and Y=50.
- Create a Gradient fill:
- Select the black rectangle. In the Properties panel, click the dropdown in the Fill Category box and choose Gradient > Linear.
The fill changes to a gradient. - Click the fill color box to launch the Edit Gradient pop-up window. Note the two sets of sliders - two on the top and two on the bottom of the gradient bar. The top sliders control opacity and the bottom sliders control the colors.
- From the Preset dropdown, select Black, White preset.
Notice that the color sliders now show white on the left and black on the right, which corresponds to the white fading to black from top to bottom in the oval.
- Select the black rectangle. In the Properties panel, click the dropdown in the Fill Category box and choose Gradient > Linear.
- Work with Multiple Files:
- Open the two files watch.png and investigator.png.
Note that each file has its own tab. - Click on the watch.png tab and drag it away from the others to float it as a separate window.
 Float the watch_promo.png tab as well.
- Drag the investigator.png tab on top of the watch.png floating window until you see a blue border around it. Release.
- This floating window now has two tabs in it.
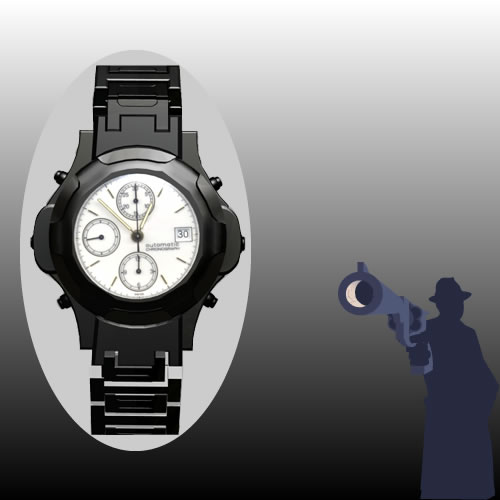
- With the Selector tool, click to select the artwork in the Investigator file, and drag it to the watch_promo window. Release the mouse. Reposition the new object at the lower right of the watch_promo canvas.
- Drag the watch artwork to the center of the oval on the watch_promo canvas.
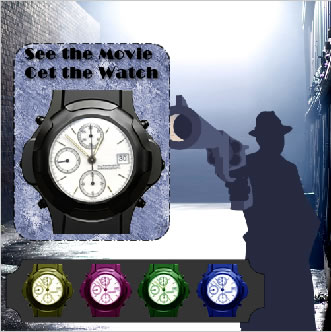
Your document should look similar to the illustration at the right. - Save your work.
- Open the two files watch.png and investigator.png.
- Crop the watch image:
- Select the watch and zoom to 150%.
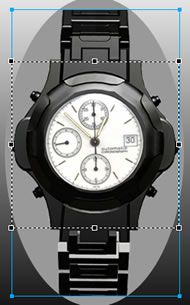
- From the Edit menu, choose Crop Selected Bitmap.
This puts crop handles around the edges of the object. - Drag the top and bottom handles so that only the watch face is visible, as in the illustration at the right.
- Crop the image, then zoom out to 66%.
- Precisely set object watch position:
- Check the position of the watch. X should be 30 and Y should be 135.
- The arrow keys to nudge the watch into the correct position - each click of an arrow key moves an object 1 pixel.
- Give the design a grittier feel with an image background:
- Hide and lock current layers:

- On the Layers panel, click the hide and lock icons for the layer containing the ellipse.
- Lock the gradient layer, but do not hide it.
- Create guides:
- Turn on the Tool tips from the View menu.
- Drag a vertical guide to the 500 pixel mark. Add another vertical guide at the 0 mark.
- Drag two horizontal guides to the 0 and 500 pixel marks.
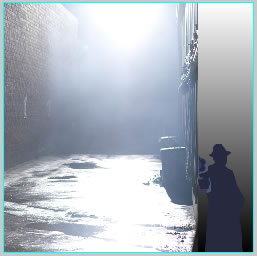 This effectively boxes in the canvas.
 - Import the background image:
- From the file menu, choose Import, and choose the file promo_backdrop.jpg file, and open.
- Place the upper left corner at the 0,0 point on the canvas and drag down and right until the bottom of the marquee is even with the bottom guide. Check the Properties panel to see that the image size is 500 pixels high.
- Release the mouse to import the image.
- Zoom out to 100%.
- Save your work.
- Scale the image:
- Use the 'old way':
Select the Scale tool (below the Selection tool). Drag the middle-right control handle to the right edge of the canvas.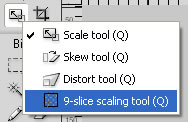 Notice how the image was stretched in one direction - There is a better way.
 - Press the Esc key to cancel the transformation.
- With the background image still selected, press and hold the Scale tool, and from the flyout menu, choose the 9-slice scaling tool.
If a bitmap image contains an aera that doesn't have a lot of detail (this is important to note), you can use the 9-slice scaling tool to make the image fit with no noticeable damage. 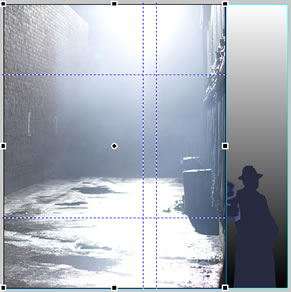 Scaling handles appear again, along with dividing guides in the image. Move the cursor over the left vertical guide. When you see a double-headed arrow, drag the guide to the right, to the area of fog in the image that has no noticeable detail.
- Move the right vertical guide to the left as well, so that it does not cross any detail area - watch out for the puddles in the foreground at the bottom.
You can ignore the horizontal guides for this example, because we are only scaling horizontally so the vertical guide locations are used.
- Drag the middle-right control handle to the right edge of the canvas - watch the horizontal ruler to see when you reach the 500 mark.
- Send the background image to then back, then bring forward one level, or use the Layers panel to drag this layer to the just above the gradient object in the stack.
- Save your work.
- Use the 'old way':
- Adjust the tonal range
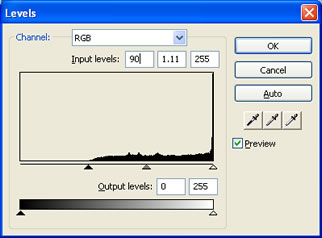 With the alleyway still selected, click the Add Live Filters button the the Properties panel. Choose Color > Levels.
- Notice that there is nothing displaying in the histogram where the shadow arrow is.
- Drag the shadows slider to the right until it almost lines up with the beginning of the histogram chart - set the value to 90, as shown in the illustration at the right.
- Lighten the midtones slightly, by dragging the middle slider to the left of an input value of 1.11.
- Click OK and examine the results - definitely better, but still too dark in the shadows and too bright in the midtones.
- Click the 'i' icon in the filter list on the Properties panel.
- Change the shadow input value to 80 and change the midtones input value back to 1.
- Save your work.
- Import, Align and Group objects:
- Import the image watch_colors.png, placing it below the watch image.
The imported layers look messy, but are like they might be if you dragged and dropped several images onto a cavas. - All four images should still be selected. Open the Align panel (Windows>Align if it is not in the panel groups).
- Click the Align Top Edge button.
- In the Space box on the Align panel, enter 10 instead of 'Evenly'.
- Click the Distribute Horizontally Center icon just above the Space menu.
The colored watches are distributed evenly 10 pixels apart. - With all four images still selected, choose Modify > Group (or right-click and choose Group from the shortcut menu).
Check the layers panel to see that a grouping layer has been created that contains 4 objects. - Select the group and drag it so that the left edge lines up with the left edge of the main watch object - a smart guide will appear when you are close to tell you it is lined up correctly.
- Select the regular Scale tool. Drag the upper right handle until the Properties panel displays W:344, H:80
- Move the group with the up/down arrow keys, or edit the value so that the y values is 398.
- Save your work.
- Import the image watch_colors.png, placing it below the watch image.
- Placing an Object using Guides:
- Add guides to the canvas - vertical guides at 19 and 255, and horizontal guides at 125 and 362.
- Choose View > Guides to make sure thet Snap to Guides has a check mark beside it (that the feature is on).
- With the Rectangle tool, draw a rectangle that exactly fits the inside of the guides, but do not release the mouse when you are done - when your cursor comes within 5 pixels of the guide, it will snap to the guide position.
- Before releasing the mouse, press the up-arrow key four times - this will round the corners of the shape - then release the mouse.
The shape appears with the last-used fill properties. - In the Properties panel, change the Fill Category, to Patten > Paint Blue.
- Open the Layers panel if necessary, to see the watch and new rectangle layers.
- Rename the new rounded rectangle layer watch background, then drag it below the watch layer.
- Below the Fill Category menu, choose Onyx from the Texture menu, and adjust the amount of texture to 40%.
This adds texture to the pattern for a more interesting effect. - Still in the Properties panel, from choose Dashed > Dash Double from the Stroke Category menu. Set the stroke color to Black and the Tip Size to 2.
- In the layers panel, drag the detective object to above the rounded rectangle.
- Select both objects and align their centers horizontally.
- Scaling Vector Objects:
- Select the detective silhouette. Switch to the Scale tool, and drag the object inward from the upper-left corner to make it proprotionally smaller.
Dragging any corner keeps the shape proportional. - Click away and notice that the edges are still sharp with no distortion of the image.
- Again with the Scale tool, drag the upper-left corner out until the Tooltip reads x:250, h:369.
If you had sized a bitmap in this manner (smaller, then larger again), its quality would have decreased noticeably. Vectors can be resized without this quality damage.
- Using the 9-slice scaling tool with Vectors:
Just because there is no pixelation when scaling vectors does not mean there is no distortion, if you scale them disproportionally (changing only width or height). - Use the 'old way':
With the Scale tool, select the watch background (rounded rectangle) and drag the top-middle control handle up about 60 pixels.
Notice how the corners of the rectangle have been distorted because of stretching in one direction. So we will use the 9-slice scaling tool again. - Undo the Scaling.
- Drag the guide at the top of the rounded rectangle up to the 64 pixel mark.
You need a guide since Tooltips don't work with the 9-slice scaling tool - Switch to the 9-slice scaling tool and select the rounded rectangle, if necessary. This time the default settings are fine.
- Drag the top-middle control handle up to the guide you moved.
The rounded corners do not distort this time.
- Add Text:
- Select the Text tool and on the Properties panel, choose a showy, bold font family (like Broadway, for example). Increase the font size to 24, or whatever size close to 24 that works for the font you chose. set the Set the color to Black (you may have to click Fill Options and choose Solid before selecting the color).
- Click in the top section of the rounded rectangle and type See the Movie, press Enter and type Get the Watch.
- To add spacing between your letters, you set the tracking to a higher number (the control is just below the font family box): Enter the value or use the slider to 40.
- Click the Bold button.
- Select the text object with the Selection tool and drag it slightly (left or right, depending on where you originally clicked), until you see a centering Smart Guide to show you have centered the object with the watch and rectangle.
You could also use the Align panel if you prefer. - With the text object still selected, add a Live Filter, choosing a Drop Shadow. Set the distance to 4 and click away to apply the effect.
- Save your work.
- Add an AutoShape:
- Choose the Chamfer Rectangle tool from the Vector section of the Tools panel (stacked with the Rectangle tool).
- Drag a shape to cover the width and height of the four colored watch thumbnails.
- Set the fill color to #343434, to match the gray background of the watches.
- On the Layers panel, drag the Chamfer Rectangle layer to below the watches Group layer.
 Click one of the yellow corner diamonds to toggle through the corner options, returning to the original chamfer shape.
 - Click the fifth yellow diamond (in the lower-right corner) to resize the object to fit nicely around the watches.
- Drag the object to center it horizontally and vertically behind the watches (Smart Guides will help you). Resize and recenter as needed, until you are satisfied with its size and position.
- Add a Stroke to the object using Pencil > 1-Pixel Soft, color Black.
Your finished artwork should look similar to the illustration at the right.
- When you are satisfied with design, save your work and keep it open for Task 5.
Task 4 - Movie Poster
- Open the file street_scene.png in Fireworks.
- Import the file movie_title.png and place it anywhere on the canvas.
- Transform the Title Object:
- With the title object selected, choose Modify > Transform > Numeric Transform.
- Change the sizing option to from Scale to Resize.
- Set the width to 467 pixels and be sure the Constrain Proportions check box is selected. Click OK.
- Place the title object at X=198 and Y=121.
- Draw a Shape:
- Open the Layers panel and lock the two group objects layers and the bitmap layers. Hide the layer with the detective on it so you can easily see around the whole title.
 Switch to the Pen tool. In the Propertes panel set the Fill to none, the Stroke to Basic > Hard Line, the color to #990000 and the Texture to 0%.
- Create a path object similar to the illustraton at the right, clicking (without dragging) to set each point.
You could use the existing invisible path as a guide if you prefer. - Close the path by clicking on the starting point (you will see a little circle with the tool to indicate you are closing the shape.
Hide the original path shape if you used it, then reselect the path you drew.
- Use the Subselection tool to reposition any points to to adjust the shape to how you want it. (It does not have to be exactly the same as the example, it just needs to be a background for the title.)
- Move the object you created to behind the text, sizing to be larger than the text and positioning as needed to look attractive.
- Save in your FW Practice folder as Lastname Movie Poster.png and keep it open.
- Add Fills and Strokes:
- Add a Linear Gradient as the fill.
- Select the object with the Selection tool, if necessary - you should see a black control arm in the gradient.
This arm controls the location, direction, and length of the gradient. The circle control point sets the postion/starting point for the gradient, the square controls the angle and length. Default setting is top to bottom, the whole height of the object. - Click and drag the circle control point so that it rests on the top edge of the shape.
 Move the mouse onto the line of the arm - the cursor changes to a rotation icon. Click and drag so that it is roughly parallel to the angle of the top of the shape.
- Drag the circle point so it is positioned in the gap of the shap at the lower left.
- Drag the square control to shorten the gradient and to change its angle similar to the illustration at the right. (Your colors may vary from the example.)
- Click the Fill Color box to open the Edit Gradient window.
- Click the left color pointer below the gradient bar, and change it to #252A41. Change the right color pointer to #C3112E.
- Add a Drop Shadow to the object.
- Change the Stroke Tip Size to 38, and change the Stroke Category to Oil > Splatter.
- In the Stroke Category menu, choose Stroke Options. Click the Fill Over Stroke options and click away to close the window.
- Change the Stroke's edge softness to 19. Choose DNA from the Texture menu, and set it to 30%.
- Unhide the detective layer. Move your Path layer to below the detective layer, making the detective and title fully visible.
- When you are satisfied with your work, save your work and keep it open for Task 5.
Task 5 - Optimize and Export
- Optimize your movie_poster file for printing as a TIFF file. Use 2-Up or 4-Up to compare and choose the best settings to keep high quality and lowest file size. (this will be a big file as a tiff, in any case)
- Export your file as a tif using your settings and the same filename with the new file extension.
- Export your file as a PDF as well, with the View PDF after Export option checked. Close the PDF view after inspecting it for quality.
- Switch to your watch_promo file.
- Optimize it for use on the web as a jpg file. Use 2-Up or 4-Up to compare and choose the best settings to balance quality and file size, while keeping the download speed at 15 sec or less.
- Export the file as a jpg using your settings and the same filename with the new file extension.
- Save and close both files.
Place a zipped copy of your FW Practice folder in the WebDesign dropbox. (It should contain
12 files saved during the course of this assignment.)