
![]()
Fireworks
Lesson 1-1:
Intro to Fireworks, Using Basic Vector Drawing Tools
Adobe Fireworks program was originally designed by Macromedia to work directly with Dreamweaver (and Flash) to support Web Design. Fireworks functions as both a bitmap editor and a vector drawing program, so other than very complex image production needs, one program will do most of what is needed for web pages. When Adobe bought out Macromedia, they kept Fireworks grouped with Dreamweaver because they work so well together
Most images on the Web are bitmap graphics (GIF, JPG, or PNG files). Bitmaps record information pixel-by-pixel and color-by-color. The size of a bitmap is determined by the number of pixels and colors used to define the image. Creating and editing bitmaps has its limitations. As with paint on canvas, you need to completely remove a mistake. When editing bitmaps, you need to completely eraser or ‘paint' over the mistake.
Vector graphics on the other hand use mathematical formulas to describe the image. They provide more precise control when creating the image and allow for more advanced editing modification.
By combining these drawing methods in the same application, you get a powerful and versatile set of tools. You get the features of photo editing and paint programs along with the precision of a vector drawing program, and your finished graphics are optimized for use in Web pages.
Beginning a New Document
- Start Adobe Fireworks CS5.
To create a new document, you can:- Click Fireworks Document under Create New on the splash screen that displays when you open the program.
- Use the File menu and select New to create a new empty document.
- The New Document dialog
box opens from either source
- Enter document preferences in the New Document dialog box:
- You can set the canvas size using pixels, inches or centimeters. Set the size to 200 by 200 pixels
- The Resolution is (should be) set to 72 pixels per inch – this is the default for Web graphics.
- The Canvas Color is the background color of your document. You can choose a white canvas, a transparent canvas or a custom color canvas. Display the color palette by clicking the Custom button and click the Custom Color box to its right.
- The pointer becomes an eyedropper that you can use to select colors from anywhere on the screen, including the default palette of web-safe colors (216 choices). Choose a color for your background.
The Fireworks Workspace
All the controls for your fireworks objects or elements are in panels to provide easy access to the controls. Each panel is draggable so you can move and group panels together to create the best arrangement for your needs.
The Properties Panel
This area is located across the bottom of the screen, and displays options that change according to what is currently selected. If a tool is selected, it shows the tool's options. If an object is selected, it shows the options available on that object. Changing settings in the Properties Panel can modify the properties of a tool or object.
The Tools Panel
On the left, by default, you see the Tools Panel. It is divided into clearly labeled section for easy tool selection. Note the six different groupings and the several tools in each group. Hover your mouse pointer over a tool and a ScreenTip will appear to identify the tool. Some tools have a little down arrow at the lower right corner – clicking and holding on the tool will cause a submenu to appear, showing additional possibilities for that tool. The chart below indents grouped tools below the default tool.
The tools used for drawing and editing vector images are listed in the table below:
Selection tools |
Description |
Pointer |
Selects and moves objects on the screen. |
Select Behind |
Selects an object behind the currently selected object. |
Subselection |
Selects and moves paths on the screen, selects an object within a group, displays points on a path, and selects points. |
Scale |
Resizes an object horizontally, vertically or proportionally |
Skew |
Transforms an object by slanting it along the horizontal or vertical axis or along both axes. |
Distort |
Changes the size and proportion of an object. |
Crop |
Discards portions of a document. |
Export Area |
Exports a portion of a document. |
Vector Tools |
Description |
Line |
Draws straight lines with editable paths. |
Pen |
Draws vector objects by plotting points along a path. |
Vector Path |
Paints freeform lines with editable paths. |
Redraw Path |
Redraws or extends a segment of a selected path while retaining the path's stroke, fill, and effect characteristics. |
Rectangle Ellipse |
Use the Rectangle tool and other tools in this group to quickly draw basic shapes. Only rectangles are drawn as grouped objects which allows you to adjust corner roundness after drawing. In all other instances, basic shapes draw paths. To move a rectangle corner point independently, you must ungroup the rectangle or use the Subselect tool. |
Text |
Creates text blocks and selects and edits existing text. |
Freeform |
Pulls or pushes a selected path or part of a path to reshape it. Fireworks automatically adds, moves, or deletes pints along a path as you edit it. With the Freeform tool selected, you can use the Properties Panel to control the size of the push pointer. Use the arrow keys to resize the push or pull pointer as you draw. You can also press 1 to make the pointer smaller or 2 to make the pointer larger. |
Reshape Area |
Modifies the shape of a vector object when you select this tool and drag across a selected path. The Reshape Area tool contains inner and outer circles. The outer circle controls the gravitational pull or size of the area that is reshaped. The inner circle controls the strength of the tool. A narrow inner circle produces a narrower shape. |
Path Scrubber – Additive |
Use these to change the appearance of a path. Using varying pressure or speed, you can change the path's stroke properties. These properties include stroke size, angle, ink amount, scatter, hue, lightness and saturation. |
Knife |
Splits a path into two or more paths. |
Exercise - Practice Using Vector Tools
In this lesson you will be working with some of the vector drawing tools in Fireworks. Using these tools you will be able to create a variety of graphics such as navigation buttons and logos for your sites.
Most drawings, even the most complicated ones are made from a variety of basic lines and shapes. There are several basic shape tools for creating vector graphics: the Rectangle, Rounded Rectangle, Ellipse, Polygon tools and Text tools.
Before you begin, create a new Fireworks folder in your home directory
WebDesign folder. Save your work for Fireworks lessons and practice in this new folder.
- Start a new file in Fireworks:
- Start Fireworks CS5.
- Select File, New. Set the canvas height and width at 500 and canvas color to white, click OK.
- Save your project in your Fireworks folder
as Lastname StarButton.png.
- Draw the objects
 :
:
It is good practice to set the properties of a drawing object just after you choose the tool, before you begin to draw the object. Of course, most properties of an object may be changed later, but not the number of sides or type of a polygon/star. - Draw a polygon
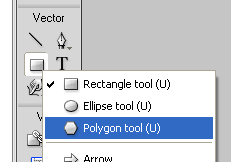
- In the Vector Tool box, click and hold the Rectangle Tool, then choose the Polygon tool from the list as shown at the right.
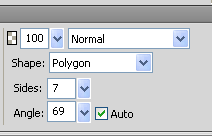
- At the right side of the Properties panel (illustration below), set the shape to Polygon and choose a number of sides to make a polygon (5 or more). Leave the Automatic box checked.
 On the Properties panel, set
the line color to black by clicking the line color box and choosing
black (#000000)
-
 Turn
off the fill color by clicking the fill color box and choosing
the red strikethrough.
 - Drag to draw your polygon, moving the mouse to set both the
size and the rotation of the object. When you are satisfied with
it, release the mouse button.
- Draw a star
- With the polygon tool still active, change the properties to draw a star shape. Keep the same number of sides as the polygon.
- Draw a star that will fit inside the polygon, rotating
it to make it look like you want.
(Possible result is shown below.)
- Draw a rounded rectangle
- Switch to the Rounded Rectangle tool.
- Holding the shift key, draw a rectangle that is large enough
to surround the polygon
with a little space around it.
- Fill the shapes with color:
- Fill the star
- Click the selector tool, then click on the star.
- Click on the fill color box. Choose a medium to dark color for the star.
- If you wish, you can set the line color to the same as the fill, or turn off the line.
- Fill the polygon
- Select the polygon. Click on the fill color box.
- Choose a light color for to be a good contrast to the star and rectangle.
- Turn off the line if you wish
- Copy the fill from the star to the rectangle
- Select the rectangle. Click on the fill color box.
- Move the eyedropper cursor to the star you already filled. Click on the color in the star; this will choose that color for the rectangle.
- Turn off the line if you wish.
- Fill the star
- Reorder the layers:
- Notice that the rectangle will now cover up the star and polygon.
- Select the rectangle. From the Modify menu, chooseArrange, Send to Back.
- You could also rearrange the layers using the layers pane on
the right side of the screen, dragging them to the order you want.
The layers will be listed from top to bottom order.
- Resize the shapes:
- Select the rectangle.
- Click the Scale tool.
 Drag
the lower right corner of the rectangle until the height and width
boxes (properties window) read 180 when you release the mouse.
 - You could also enter the values into the height and width boxes.
- Resize the polygon to height and width of 160, and the star
to a height and width of 155.
- Add Text:
- Click the Text tool (the large A).
- On the Properties Panel, set the font to Comic Sans MS, the size to 20 and the color to your polygon color. Set the text alignment to center.
- Click near the right center edge of your star and type Fireworks!
 Align the shapes:
- With the Selector tool on, draw a selection rectangle around the three shapes. All four objects are selected at the same time.
- From the Modify menu, choose Align, Center Vertical.
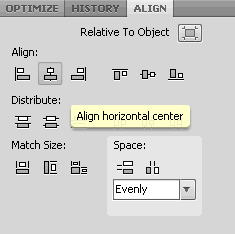
- At the right of the screen, you should see several panels. Look to see if ALIGN is on a tab. If not, click the Window menu and choose Align.
- Reselect all of your objects if necesary. In the Align panel, click the Align Horizontal Center button.
Object should now be centered on each other in both horizontal and vertical directions.
- Group the object:
- With all objects still selected, choose Group from the Modify menu.
- The shapes are now all one object.
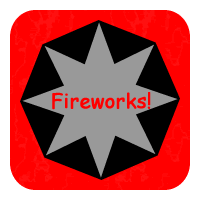
- Trim the canvas:
- Move the grouped object to the upper left corner of the canvas.
- From the Modify menu, choose Canvas, Canvas Size.
- Change the height and width to 200, and click the upper left corner anchor box.
- Click OK. The canvas is now smaller.
- Center the graphic on the canvas by setting the X and Y positions
both to 10.
- Resave your work. Close the file.
- Leave Fireworks open for the next activity.
Practice 2 - Working with Line and Fill Options
The line of an object is its border. You have many choices of settings to give the edges of objects different weights and effects.
The fill of an object is the color within the border. Many different options are available here as well, such as textures, patterns and gradients.
Exercise 1 - Using Line Options
Stroke weight (Tip Size)
-
 Start
a new file, with a 400 x 400 white canvas. Save it as Lastname
LineFill.png.
 - Select a drawing tool that has a fill possible, setting a fill color of your choice. Draw a medium sized shape to use for your experimentation.
- Draw two more shapes, using any tool you like.
- Select one of the shapes
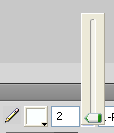
- Set a contrasting stroke color and click the down arrow beside Tip Size box. A slider appears, with which you can adjust the weight of the line border of an object. Slide to 10 to see the effect.
- Type 2 in the Tip Size text box. You can also set size this way.
 Stroke
Category
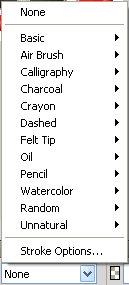
- With your shape still selected, click the drop-down arrow next to the Stroke Category box.
- Choose Pencil > Graphite. The Tip Size is changed automatically according to your Category choice, though you can still change the size if you want.
- Experiment with some of the choices to see the effects from different categories. Be sure to look in the Random and Unnatural categories for some unusual effects.
Edge
- The Edge setting affects the sharpness of the edges of any border. A setting of zero makes the edge sharp, with no blurring at all.
- Change the Edge setting to 10 and notice the difference.
- Experiment with edge settings combined with different stroke categories.
Texture
- Can also use a Texture setting to change the look of your shape's edges. These effects work better with wider borders.
- Change the line on your shape back to Pencil > 1-pixel soft, then change the Tip Size to 10.
- Choose a Grid 5 from the Texture drop-down box, and set the Amount of Texture to 80%.
- Experiment with other textures and texture amounts to see how they look.
- Finish by adding an interesting edge on each of your shapes. Save.
Exercise 2 - Using Fill Options
 Draw a two new borderless obects that overlap each other. Choose
a different fill color for each object.
Draw a two new borderless obects that overlap each other. Choose
a different fill color for each object.- Select the top object, then click the Opacity box and change the value to about 60%. Note how the color of the shape beneath shows through somewhat. The lower the opacity number, the more the see-through the shape will be.
- Experiment with the opacity, to see the different effects.
Texture
- Choose the bottom of the overlapping objects. The same textures as you used for lines may also be applied to the fill of objects. Choose the Vein texture and adjust the Amount of Texture setting until the shape looks like it is made of marble.
- Select the top object. On the Properties Panel, locate the Opacity control at the top right of the panel. Drag the slider down to 60%. The grid pattern that appears means that the color will be semi-transparent in that area, letting any color below the shape come thru there.
- Adjust the opacity setting of the top object so that you can see the veining of the bottom through the top slight transparency
 Choose one of your original shapes.
 - Experiment with other textures and amount settings, leaving it as you like.
Patterns
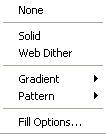
- With another of your original shapes selected, click the drop-down arrow next to the Fill Category box. The list at the right appears. Click Pattern, and a big list of available patterns appears.
- Choose Berber. Note the adjustment lines that also appear when a pattern-filled object is selected.
- Shorten the lines to observe the effects, and move the end points of the lines around to see how the pattern changes.
 From
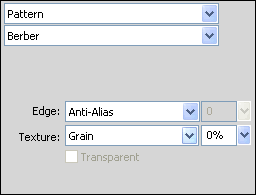
the same menu, choose Fill Options… A dialog box appears. In
the Pattern name box, you will find many other patterns to choose from,
all of which are adjustable to create the look you choose.
 - Experiment with patterns and settings, leaving your object with an interesting effect.
Gradients
- Select the third of your original objects.
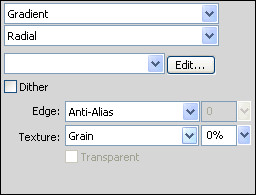
- In the Fill Category list, the choices in the center section – Linear through Folds – create Gradient fills. Gradients add colors along a continuum, shading from one color to another. There are several different shapes the gradients may take, depending on your choices.
- From the Fill Category list, choose Folds.
- Change the length of the control line to see what happens. Move
the control line end points around the shape to see the different effects.
Editing Gradients
- From the Fill Category list, choose Linear. Then open the box again and choose Fill Options…
- In the blank box under the Gradient name you can choose from Preset gradient color sets. Choose one or more of these to see what they do.
- Undo to change back to your original colors.
- Choose
Fill Options again and click the Edit button. The box at the right
appears.
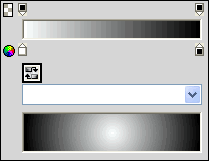 The top continuum box controls the look of the gradient. The bottom
arrow boxes (little house shapes) control the color and location of
the gradient bands. The top arrow boxes control the location of color
transparency bands.
 - Drag the left gradient control (left bottom house) to the right. Observe the effect in the Preview box. Return the arrow to where it was, and drag the right gradient control to the left, again observing the effect.
- To observe the effect on your object, click outside of the dialog box and to close it.
- Reopen the Fill Options dialog and click the Edit button. Click the left transparency box and drag the slide to 75%.
- Place your pointer anywhere between the two gradient boxes – a plus-sign appears beside the cursor. Click, and a new gradient box will appear.
- Click on the square part of the new gradient control. Select a different color and observe the effect in the Preview box.
- Continue to experiment with color, placement and transparency of gradient controls to see different effects you can create.
- Leave your object with an effect you like
- Save your file and close it.
Exercise 3 - Apply Lines, Fills and Effects to your graphic
Now you will apply your new skills to the vector graphic you created
in Practice 1. The illustrations provided are examples of what your finished
drawings might look like. You will be adding the 'edge' effects you see
and the text glow in the next lesson. 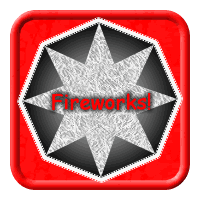
- Open your starbutton file.
- Ungroup the parts, or use the sub-select tool to access them.
- Select the each element and choose a new color, gradient or texture.
- Choose line effects, fill effects, gradients, patterns, and/or textures to fill the three shapes of your button. Use at least one line effect, at least one texture or pattern, and at least one gradient. Choose your fills and effects so that it creates a pleasing overall appearance.
- Regroup your graphic and save.