
![]()
Fireworks Lesson 1-2:
Using
Advanced
Vector Drawing Tools
In this Lesson, you will create a military medal, then enhance its appearance with Live Filters. You will also enhance your Star Button from the first lesson.
About the Combining Commands
More complex drawings are still usually a combination of basic shapes. But it is possible to edit basic shapes, changing their size, slant, direction, and even combining shapes into more complicated arrangement.
You can also use Combining Commands in the Modify menu allows you to combine your shapes in several ways. For example, you can create a single shape out of two or more overlapping shapes, you can 'cut out' one part of a shape using another shape.
Using such techniques, you can build more complex shapes.
Exercise 1 - Scale, Skew and Distort
- Start a new Fireworks canvas, setting the canvas height and width at 400, set the canvas color to white.
- Draw a star or polygon, using any number of sides you like, setting colors as you wish. Leave your object selected.
- Scale:
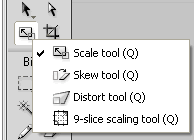
- In the Select Tool box, click and hold the Scale tool. You will see that there are two more tools with this button, the Skew tool and the Distort tool. Choose the Scale tool.
- A black outline with black handles appears around your object. Move the pointer to a corner handle. The pointer changes to a two-headed arrow. Click and drag the pointer out away from the shape. How does the shape change?
- Move the pointer to a side handle and drag as before. How does the shape change?
- Move the pointer to the area outside a corner handle, until the pointer changes to a circular arrow. Click and drag toward one side of the shape. What happens?
- Skew:
- Switch to the Skew tool.
- Move the pointer to one of the side handles of the object, until the pointer changes to a small two-headed arrow. Click and drag along the side. What happens to the shape?
- Move the pointer to on of the corner handles of the object. Click and drag away from the shape. What happens? Drag the corner back toward the shape, and farther in. What happens?
- Distort:
- Switch to the Distort tool.
- Move the pointer to one of the side handles of the object, until the pointer changes to a small two-headed arrow. Click and drag along the side. What happens to the shape?
- Move the pointer to one of the corner handles of the object,
until the pointer changes to a small two-headed arrow. Click and
drag away from the shape. What happens to the shape?
- Delete your shape to clear the canvas.
Exercise 2 - Using Path commands
- Save
your canvas in your Fireworks folder as Lastname
medal.png.
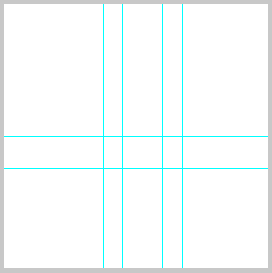 Setting up Guides:
- Use the View menu to turn on the rulers.
- On the View menu, verify that the Guides are on - there will be a check mark beside 'Show Guides'.
- Place your cursor just above the bottom of the horizontal ruler, and drag down into the canvas. A guide line should appear.
Drag it until you have it exactly on the 250 mark on the vertical ruler (the mark will turn white). - Drag another horizontal guide, placing it at the 200 mark on the ruler.
- In the same manner, drag a guide from the right side of the vertical ruler to the 150 mark on the horizontal ruler.
- Drag a second vertical guide to the 290 mark.
- Drag two more vertical guides, placing them exactly 40 pixels inside each existing vertical guides.
Your canvas should appear similar to the illustration at the right.

- Create and align the shapes:
- On your canvas, draw a rectangle, 60 pixels wide by 180 pixels high. Be sure there is a fill color and no line on the shape.
- Place the shape so that its bottom right is at the intersection of vertical 250 and horizontal 150, where the guides intersect.
As you bring it close to this location, the shape should 'snap' to the correct location. - Copy and paste it twice. (The copies will appear right on top of the original.)
- Drag the copies away so you can see each, and change the colors of two of them so you can distinguish between them better.
- Arrange the shapes so that they are aligned along the bottom guide, and overlapping them as shown. The right side of the rightmost shape should just touch (it should 'snap' to) the rightmost vertical guide. Center the middle shape between the two center guides (should also snap into place)
- Select all three shapes and check the width - the combined shape should be 140 pixels wide.
- Use the Knife Tool:
- With the three objects selected, click the Knife tool in the Vector toolbox.
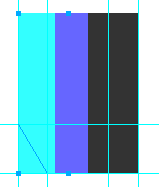
- Beginning at the guide intersection at y = 200 (vertical) and x = 150 (horizontal), click and drag the knife down to the guide intersection at y = 250 and x = 180. This will cut a 'slice' off the left corner of the left rectangle shape.
- Reselect the shapes and repeat to slice off a matching section at the bottom right.
 Deselect
the shapes. With the pointer tool click one of the corners you
sliced to select it. Press delete.
 - Delete the other corner.
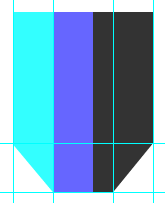
Your shapes should look similar to the illustration at the right. - Hide the Guides (click to remove check mark on the View menu)
- Using the Join and Split commands:
 Next, select all three shapes and choose Modify > Combine
Paths > Join.
Notice the "negative" shapes that appear in the middle where the three shapes overlapped. This is the key to the Join command.
Another thing to note, is that if each shape has a different fill color, the combined shape retains the color of the shape that was lowest on the "stacking order."
- There is also a Split command. Select your new shape and go
to Modify > Combine Paths > Split.
Your three original shapes should now be back to normal, except for the color.
- Undo the split so that the paths are joined as before.
- Using the Punch command:
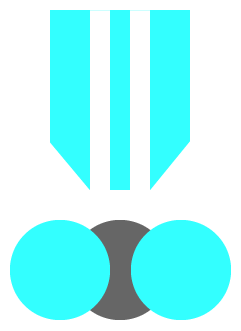 Punch is a very helpful option, as it allows you to make multiple
paths and then use one as sort of a cookie-cutter, that 'punches' its shape out of the others.
- Select Ellipse tool (same button as the rectangle tool). Now
make 3 circles 100 pixels in size (hold Shift) and overlap them
as seen in the next illustration.
You could copy and paste them again. - Arrange them overlapped evenly below the center of the ribbon shape.
You could use the Align panel to align their tops and distribute their widths.
- Select the center shape and one of the others. Choose Modify > Combine Paths > Punch.
The shape on top "punches" its shape out of the bottom shape. - Select the two remaining shapes and repeat the Punch.
- Select Ellipse tool (same button as the rectangle tool). Now
make 3 circles 100 pixels in size (hold Shift) and overlap them
as seen in the next illustration.
- Using the Union command:
The union command basically does the same thing as Join, but instead of making a "negative" shape, it actually combines all the points in the paths to make a single, fluid shape.
 Select your new shape. Copy and paste it.
 - Choose Modify > Transform > Rotate
90 degrees.
The rotated shape is now on top of the other shape to make a cool cross thingy.
- Select both your shapes in the cross and go to Modify > Combine
Paths > Union.
Notice how both shapes are now one. The overall shape should not change.
 Using the Intersect command:
The intersect command takes two shapes and then forms a new shape from where they intersect.
- Draw two more circles, about 60 pixels in size, and overlap only the very edges as in the illustration at the right.
- Select both shapes, choose Modify > Combine Paths > Intersect.

Notice how the new shape was formed from the intersection of the other two.
- Assembling your Finished drawing:
Now you have what you need to assemble the finished project. These parts can easily become a military medal, by a little arranging of the created pieces and a little adjustment.
- Copy and place three small intersection shapes behind each cross arc
(rearrange
layers as needed).
It might be faster to arrange one set, and group them. Then copy, paste and flip (Modify > Transform) for the others. - Select the ribbon and add a stroke to create edges between the sections of the shape.
- Add a small rectangle and ring to ‘hang’ the medal.
- Arrange it all to your satisfaction and select all the shapes, group them, and you are finished.
- Copy and place three small intersection shapes behind each cross arc
(rearrange
layers as needed).
- Save your file and close.
About Live Filters
Live Filters are filters that apply to vector, bitmap, and
text objects. Applying a Live Filter does not permanently change the
original object. If you make a change to the original
object, such as choosing different fill or stroke colors, changing the size, or skewing it, the Live Filter updates automatically.
For
example, if you create a shape and then use Live Effects to apply a bevel
and drop shadow, you can change the color and size of the original shape,
and the effects will be reapplied automatically to the new modified shape.
Editing Live Filters
When your object is selected, you will see the effect you applied is in a list box on the Properties Panel. You can click on the info button of an effect to verify or change its settings.
Layering Live Filters
You can apply more than one live effect to an object at the same time.
The effects are applied in the order they are listed in the box. 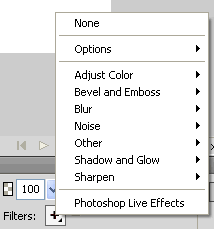
Reordering Live Filters
When multiple effects are applied to an object, the order of the effects in the Effects list can change the look of an image.
- Select an object that has more than one effect applied.
- Select the top effect name in the Effects list and drag it to below the second effect. The look of the object changes.
- Experiment with other combinations.
Deleting Live Filters
If you find you no longer want to apply a particular live effect, you can delete it.
Exercise 3 - Working with Live Filters
You apply or remove Live Filters by using the Filters pop-up menu on the Properties Panel.
- In a new Fireworks document, draw a three or four largish objects to practice with, adding fills that are solid, not too dark.
- Save in your Fireworks folder
as Lastname MyPractice.png.
- Add a Live Filter:
-
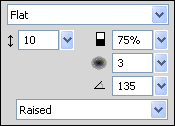 With an object selected, click the Add Filters button (the plus
sign next to ‘Filters') on the Properties Panel, choose Bevel
and Emboss, then Inner Bevel.
The effect is immediately applied, and a pop-up window opens.
- In
the Bevel edge shape box choose Smooth. Set the Contrast at 75%, the
Softness to 3 and the Angle to 135.
- Enter 25 in the Width box, then click somewhere else in the dialog box to see the effect change.
- Click
outside of the dialog box to close it.
-
- Edit a Live Filter:
- In the list box in the Filters area, click the info button of the Inner Bevel effect to open its dialog box.
- Change the Width to 35.
Click elsewhere to observe the change.
- Experiment with adding filters to your shapes, adjusting settings to observe what
effects they create.
- Layer Live Filters:
- Select one of your objects that has an effect applied.
- Click the Add effect button again, this time choosing Shadow and Glow, Drop Shadow.
- In the pop-up window, set the fill to black, the Distance to 10,
the Opacity to 65%, Softness to 10 and the Angle to 315.
- Reorder and Delete Effects:
- Select the shape that has two filters applied.
- Click on the Inner Bevel filter name in the list box.
- Drag it down until you see a blinking black line below the Drop Shadow layer, then release.
You have changed the order in which the filters are applied, and the effect will change. - Drag the effect back to its original order to and observe the effect.
- With any object selected, click the check mark for a filter in its list box.
The filter effect is hidden - Click the red X to turn the filter back on.
- With any object selected, click a filter name you want to permanently delete from its list.
- Click the minus-sign button to the right of the +. The filter is removed.
- Continue to experiment with filters and filter combinations on your shapes. Create a pleasing arrangement with the filters as you like them best.
- When you are satisfied, save your practice workspace.
Exercise 4 - Adding Live Filters to your Medal
Adding Texture and Filters to your Military medal: 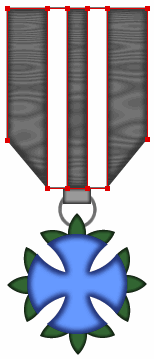
- Open your medal file. Immediately resave as Lastname finished medal.png.
- You will need to either ungroup, or use the sub-select tool to access the individual parts of the graphic.
- Select the ribbon section. Modify the fill color if you wish, apply the satin gradient fill effect, adjusting the colors and look of the gradient to make it look more like real ribbon.
- Also on the ribbon section, then apply the inner glow effect with a width of 4-6 and softness of 2-4, adjusting the glow color to look well with your ribbon color
- Select the cross section (not the ‘leaves' underneath). Apply an inner glow to this section also, adjusting the settings to look good to you.
- Select the ‘leaves' underneath the star and inner glow them too, and they will need lower settings since they are smaller parts.
- Add filters as you like to the ring assembly as well.
- Regroup your graphic and save
Adding Filters to your Star button:
- Reopen you Star Button file. Save immedialtely as Lastname StarButton2.png.
- Ungroup the parts, or use the sub-select tool to access them.
- Select the text. Add a glow live filter, reducing the width and softness to low numbers to define it a bit.
- Apply at least two more live filters. Choose your filters to compliment your existing fills and effects so that it creates a pleasing overall appearance. (You may adjust your fills and effects is you wish, as long as you still have one line effect, one texture, one pattern and one gradent.)
- Regroup your graphic, if needed, and save.
Place a copy of all four files in the Web Design Turn-in folder on the Common Drive.